This guide is an educational resource so to speak that simplifies the process of controlling a Lego EV3 Mindstorms robot using different controllers or joysticks. This guide is a never-ending process that will continue to grow as more controllers are tested and sucessfully connected into the Lego Controller.
Xbox One / Series S / Series X controllers
Requirements
- Micro SD Category A1 8GB - 16GB with EV3DEV mounted (see tutorial)
- Lego EV3 Mindstorms brain with the SD card inserted.
- VSCode that you can install from here
- Install the LEGO Mindstorms Extension onto VSCode from this website
- USB cable to connect the EV3 into the PC
- A Xbox controller with a firmware version prior to 5.23.6.0
Set-up
For ensuring a correct process, make sure you can plug and unplug your EV3 as many times as needed. Also make sure that the PC port in the device is functional. This tutorial only covers connection using that port.
- Create a SSH session in the computer using VSCODE EV3DEV device browser that can be found on the explorer Tab at the very botton. For doing this, you need to first connect the EV3 to the PC and then create the connection. Once there is a green light by the name of the device, right-click it and select create SSH connection.
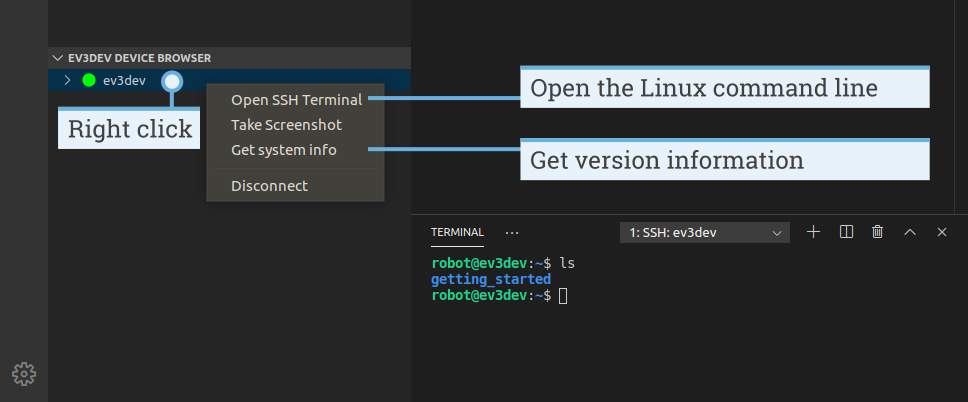
- Now, we need to disable one bluetooth device option on the EV3 to ensure the controller can be read. To do so, on the terminal you can write the following command (consider that the password for SUDO commands is maker):
sudo nano /etc/sysfs.confNavigate until the end of the document and add:
module/bluetooth/parameters/disable_ertm = 1Press Control and O at the same time, then press Enter to save. Then press Control and X to exit the editor and run the following command.
sudo /etc/init.d/sysfsutils restartIf there is an error saying that sysfsutils does not exits, then you need to install the correct dependencies. To do so, follow these instructions.
Alternatively, you can run the following commands to create a file that changes that option everytime the EV3 boots.
sudo nano /etc/rc.localThen, replace the information on that file with:
#!/bin/sh -e
# Disable ERTM for Xbox Controllersecho 1 > /sys/module/bluetooth/parameters/disable_ertm
exit 0After that, run these commands to make the file executable and reboot the device:
sudo chmod +x /etc/rc.localsudo reboot- Make sure that the ERTM module has been disable by running this command and getting a Y or 1 as output.
cat /sys/module/bluetooth/parameters/disable_ertm- Once done, you can proceed to connect the Xbox Controller by running the following commands one by one:
bluetoothctlpower onagent onscan on- Watch the terminal for a line that looks like [NEW] Device XX:XX:XX:XX:XX:XX Xbox Wireless Controller.
- When found, connect to it by running the following commands. Again, one by one. Replace the xx:xx:xx with the MAC address of the controller:
pair XX:XX:XX:XX:XX:XXtrust XX:XX:XX:XX:XX:XXconnect XX:XX:XX:XX:XX:XX- Let’s now verify that the linux subsystem in the EV3 has correclty identified and has created the device for communication by running the next command:
ls /dev/inputThis should get a list of devices similar to this:
robot@ev3dev:~$ ls /dev/inputby-path event0 event1 event2- Now, you are ready to start creating programs using the controller. However, we need to know what events are being sent to the device by the device. To do so, upload the following code to the EV3:
#!/usr/bin/env python3import evdevimport sys
# 1. Find the Xbox Controllerdef find_controller():    devices = [evdev.InputDevice(path) for path in evdev.list_devices()]    for device in devices:        if "Xbox" in device.name:            return device    return None
controller = find_controller()
if not controller:    print("Error: Xbox controller not found.")    sys.exit(1)
print("Monitoring: {}".format(controller.name))print("Press Ctrl+C to stop.\n")
EVENT_TYPES = {    evdev.ecodes.EV_KEY: "KEY/BTN",    evdev.ecodes.EV_ABS: "ABS/STICK"}
# 2. Event Monitoring Looptry:    for event in controller.read_loop():        if event.type in EVENT_TYPES:
            try:                # Get the name(s) for the code                code_lookup = evdev.ecodes.bytype[event.type][event.code]
                # If it's a list, just take the first string                if isinstance(code_lookup, list):                    code_name = code_lookup[0]                else:                    code_name = code_lookup            except KeyError:                code_name = "UNKNOWN_{}".format(event.code)
            type_label = EVENT_TYPES.get(event.type, "OTHER")
            # Now code_name is definitely a string, so formatting will work            print("Type: {:<10} | Code: {:<15} | Value: {}".format(                type_label,                code_name,                event.value            ))
except KeyboardInterrupt:    print("\nExiting monitor.")    sys.exit(0)
The previous code shows on the terminal the events that the xbox controller sends to the EV3. Be aware that each brand or type of controller sends a different set of events. This causes that the monitor needs to run before we code any program.
To create proyects on the device follow these commands:
nano monitor.pyThen replace the contents of the monitor.py file with the source code. After that, make sure the file is executable by running this command:
chmod +x monitor.pyand after that, run the code.
sudo ./monitor.py- Create a basic two-wheel car and uplod this code to control it with the remote controller:
#!/usr/bin/env python3import evdevfrom ev3dev2.motor import LargeMotor, OUTPUT_B, OUTPUT_C, MoveTankimport signalimport sys
# 1. Setup# We still use MoveTank as it provides a convenient way to set both powers at oncemotors = MoveTank(OUTPUT_B, OUTPUT_C)devices = [evdev.InputDevice(path) for path in evdev.list_devices()]controller = next((d for d in devices if "Xbox" in d.name), None)
if not controller:    sys.exit("Controller not found. Re-pair and try again.")
# 2. Calibration for 16-bit Unsigned (0-65535)CENTER = 32768SCALE = 327.68DEADZONE = 2000
def stop_robot(sig, frame):    print("\nEmergency Stop Triggered.")    motors.off()    sys.exit(0)
signal.signal(signal.SIGINT, stop_robot)
# State variablesforward_value = 0  # Vturn_value = 0     # Omega
print("Arcade Drive Mode: Left Stick (Gas), Right Stick (Steering)")
# 3. Main Looptry:    for event in controller.read_loop():        if event.type == evdev.ecodes.EV_ABS:
            # THROTTLE: Left Stick Y-axis (ABS_Y)            if event.code == evdev.ecodes.ABS_Y:                if abs(event.value - CENTER) > DEADZONE:                    # Negative because Up on the stick is 0, Down is 65535                    forward_value = -(event.value - CENTER) / SCALE                else:                    forward_value = 0
            # STEERING: Right Stick X-axis (ABS_RX)            elif event.code == evdev.ecodes.ABS_RX:                if abs(event.value - CENTER) > DEADZONE:                    # Positive because Right is higher value, Left is lower                    turn_value = (event.value - CENTER) / SCALE                else:                    turn_value = 0
            # 4. Mixing Logic            # Pushing Right stick Right (positive turn_value)            # should speed up Left motor and slow down Right motor            left_power = forward_value + turn_value            right_power = forward_value - turn_value
            # 5. Safety Clamping            # We must ensure we don't send values outside -100 to 100            final_left = max(min(left_power, 100), -100)            final_right = max(min(right_power, 100), -100)
            motors.on(final_left, final_right)
except Exception as e:    print("Runtime Error: {}".format(e))    motors.off()
Evidence
Installing EV3DEV
- Download EV3DEV image from here.
- Download and execute BalenaEtcher. Be aware that this requires admin permissions to run
- Unzip the ISO image and flash it into the MicroSD card.
Installing sysfsutils
The next commands will create a folder in your computer, then visit it. After that, download the dependencies on your local storage. After that, we need to copy the files onto the EV3 and run the instalation. Once installed, you can erase the dependencies from both your computer and the EV3.
mkdir ~/ev3_pkgs && cd ~/ev3_pkgscurl -LO http://archive.debian.org/debian/pool/main/s/sysfsutils/libsysfs2_2.1.0-5_armel.debcurl -LO http://archive.debian.org/debian/pool/main/s/sysfsutils/sysfsutils_2.1.0-5_armel.debscp *.deb robot@ev3dev.local:/home/robot/Open an SSH connection to the EV3 and run the following
sudo dpkg -i libsysfs2_2.1.0-5_armel.debsudo dpkg -i sysfsutils_2.1.0-5_armel.debrm *.debOnce done, you can return to step 2 .